
If you are constantly scrambling before class, the problem usually is not that you are disorganized. Most teachers are incredibly organized. The real issue is that your information is scattered. Your lesson notes are in one place, parent messages are in another, curriculum links are somewhere else, and your brain is trying to hold the whole system together.
That is exactly why an all-in-one teacher dashboard can change your day-to-day teaching life so quickly. When your student details, lesson sequence, notes, and next steps all live in one place, you stop rerunning the same mental checklist before every class.
This session is all about building that structure with one student first. Not ten students. Not your whole week. Just one repeatable workflow that takes less than two minutes to maintain after class and makes the next class feel calm, clear, and ready to go.
Why teachers still feel scattered even when they are organized
Here is the checklist many online ESL teachers are silently running through before class:
- What happened last class?
- Where is this student in the curriculum?
- What lesson should I open next?
- Where is the link to that lesson?
- What did I promise the parent?
- What skill are we working on this week?
That is a lot to carry mentally, especially if you are teaching back-to-back classes or early mornings in a different time zone.
An all-in-one teacher dashboard helps remove that mental load permanently by putting those answers at your fingertips. Instead of searching, guessing, or trying to remember, you follow the same simple workflow every time.
The goal: one student, one clean workflow
The purpose of this setup is simple:
- Add one student to your system
- Set their current level
- Assign their first lesson
- Teach from the assigned lesson
- Save a quick progress note
- Have the next lesson ready automatically
Once that is working for one student, you have a workflow you can repeat every week.
Step 1: Open the Teacher Hub from your dashboard
When you log in, you land on your main dashboard. From there, open the Teacher Hub. That is where the student workflow begins.

Depending on your setup, you may see different tabs across the top. Some features can be enabled or disabled based on what you want to track. These may include:
- Package tracking
- Negative credits
- A setup checklist
- Parent reviews
- A manual recurring scheduler
You do not need every feature turned on to make the system useful. If you track packages somewhere else, for example, you can leave that off. The key point is that your all-in-one teacher dashboard can be tailored to the way you actually teach.
Step 2: Add your first student
Inside the Student tab, start with a clean dashboard and click Add Student.

You will be asked to enter basic information such as:
- Student name
- Age
- Time zone
- Pronouns
- Level
- Optional notes
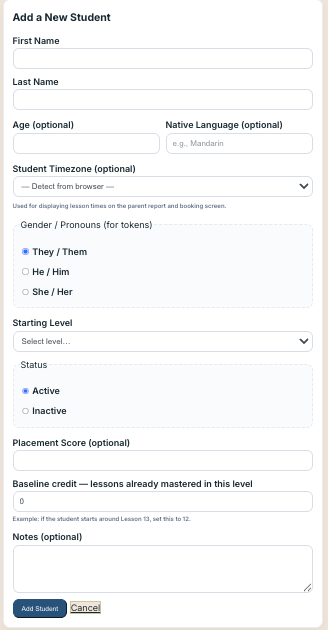
In the example setup, a student named Anaconda is added. She is 12 years old, based in Taiwan, and assigned a starting level.
The exact leveling system is flexible. You might use A1, B2, beginner, elementary, or a numbered level depending on your curriculum. The important thing is to choose a starting point. You can always refine it later as you do placement assessments or get a clearer picture of the student’s needs.
The notes field is especially helpful if you want to keep a record of parent communication. You might use it for things like:
- A parent’s WeChat ID
- A quick summary of goals or concerns
- A pasted message you want to refer back to later
This is one of the quiet strengths of an all-in-one teacher dashboard. It gives you a single home for the tiny details that are easy to lose and hard to remember.
You can edit student details anytime
After the student is created, you can update their profile using the pencil icon. That makes it easy to adjust the level, change the time zone, add a language, or update other details as needed.
Nothing has to be perfect on the first pass. The point is to get the student into the system so your workflow has a home.
Step 3: Open the student profile and assign the first lesson
Once the student is added, click the student name to open their profile. This is where the workflow starts becoming useful.
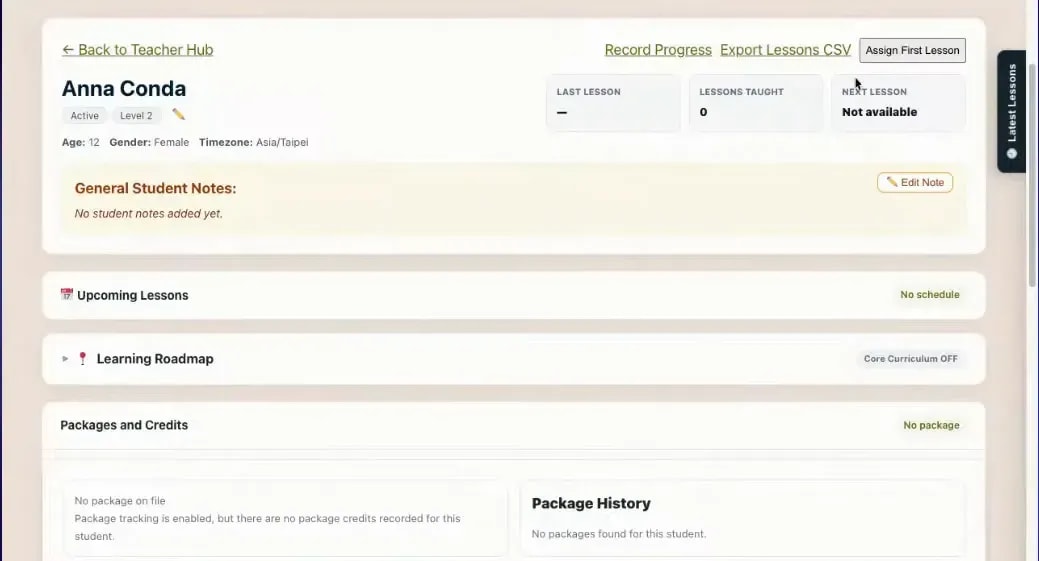
From the profile, assign the student’s next lesson. In the example, the lesson is chosen from the core curriculum at level 2, starting in the first unit, Pets, with lesson 1.
That assignment does two important things:
- It defines exactly where the student is starting
- It prepares a one-click launch button for class
When you return to the Student tab, that student now has a Start Next Lesson button.
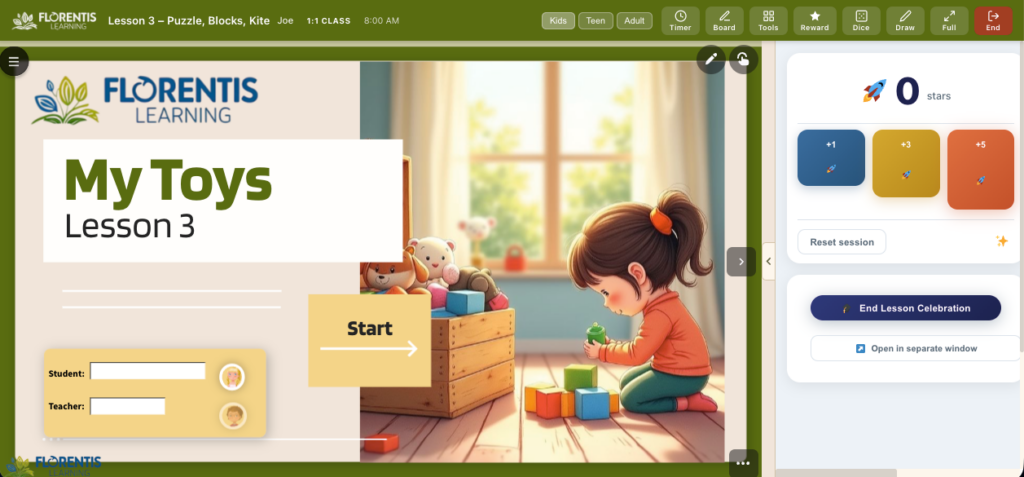
The button that changes everything
This is the feature that stops pre-class scrambling.
Once the next lesson is assigned, you do not need to search through folders, scroll through libraries, or try to remember what comes next. You click the button, and the lesson opens directly.
In the example, clicking Start Next Lesson loads the Pets lesson and opens it ready for teaching.
That is why this matters so much. An all-in-one teacher dashboard is not just about storing information. It is about reducing friction right before class, when time and mental energy are already low.
What happens after class: the two-minute workflow
After the lesson, the system recognizes that the lesson was launched and creates a follow-up teaching task. This reminds you to leave feedback.
You can complete that from the student row or by clicking the green check mark.
When the feedback window opens, the system already knows:
- Which student you taught
- Which lesson was taught
- The curriculum and level
It also includes a sample note and links relevant Florentis resources. You can then add your own feedback, rate the class with stars, and include a note for your next teaching focus.
Then you save and return to the Teacher Hub.
That single action keeps the student moving forward and keeps your future self from having to reconstruct what happened.

How the next lesson gets set
In sequential courses, saving the lesson note can automatically move the student to the next lesson.

When you need to assign lessons manually
Automatic sequencing is extremely helpful, but it will not apply in every teaching situation.
You may need to assign lessons manually when:
- You teach conversation lessons that are not sequential
- You switch between course types
- You alternate between core curriculum and phonics
- You want to choose lessons based on student performance rather than order
In those cases, the rule is simple: never close the hub without assigning the next lesson.
This is where an all-in-one teacher dashboard still does the heavy lifting. Even when the sequence is manual, the system gives your decisions a consistent home.
Why this workflow feels so much calmer
When your next lesson is already set, several things change immediately:
- You stop searching for links
- You stop second-guessing what comes next
- You stop forgetting what you told parents
- You reduce decision fatigue
- You create continuity from one class to the next
If you are teaching multiple lessons in a row, that matters even more. You can move from class to class by simply clicking the button and opening the right lesson. The system also keeps track of which feedback tasks still need to be completed.
The result is not just better organization. It is a calmer teaching presence. You show up prepared, focused, and professional because the system is carrying the load with you.
Reusable feedback messages save even more time
If writing parent communication after every lesson feels like a drain, templates can help tremendously.
Within the Florentis system, lesson notes can already include pre-created feedback tied to the lesson content. Those notes can be edited, expanded, or personalized however you like. They are simply a starting point.
You can also keep a small bank of reusable messages for common situations.
Example: progress update
Anaconda confidently used past tense in speaking today. Really lovely progress this week. Next class, we’ll keep building on this with a reading and speaking task.
Example: celebration note
Today was a big confidence win. Anaconda answered questions with much less support. So proud.
These kinds of messages help you communicate faster while still sounding thoughtful and professional. They also build parent confidence, which supports stronger long-term relationships and renewals.
The three Teacher Hub rules to keep your system working
If you want this workflow to stay simple and effective, follow these three rules.
1. Always save one note
Even if it is only one sentence, save a note after class. That note keeps continuity alive and supports your next lesson flow.
2. Never close the hub without assigning the next lesson if the sequence is not automatic
If your curriculum path is not linear, make the decision while the class is still fresh. Your early-morning self will be very grateful.
3. Always write the next class focus
Choose one skill or one goal. Write it down while the lesson is still clear in your mind. This creates true continuity and helps you teach with intention instead of improvising from memory.
These three habits are small, but together they turn an all-in-one teacher dashboard into a calm teaching system rather than just another tool.
What this looks like in real life
Here is the full daily rhythm in its simplest form:
- Open the Student tab
- Click Start Next Lesson
- Teach the class
- Log one progress note
- Add one next-step focus
- Let the next lesson update automatically, or assign it manually
- Close the hub and move on
That is the shift from survival mode to structure.
You do not need a giant admin block at the end of the week. You do not need to reconstruct classes from memory. You do not need five tabs and a notebook and a messaging app open at once just to feel prepared.
You need one workflow that you trust.
Start with one student, not your whole roster
If you are setting up a new system, resist the urge to overhaul everything at once. Start with one student profile. Add the basics. Assign the first lesson. Teach one class through the workflow. Leave one note.
That single action is enough to prove the system works.
Once you feel that relief of opening the right lesson instantly and knowing exactly what comes next, it becomes much easier to repeat the process for the rest of your students.
Move from Scrambling to Smooth
The Teacher Hub is your back-office partner. Stop chasing schedules and start teaching with a professional system designed specifically for independent ESL tutors.
FAQ
What is an all-in-one teacher dashboard?
An all-in-one teacher dashboard is a single system where you can manage student profiles, lesson assignments, notes, follow-up tasks, and next steps without jumping between multiple tools.
What information should I add when creating a student profile?
Start with the basics: student name, age, time zone, pronouns, and a rough level. You can also add optional notes such as parent communication details or reminders that will help you teach more smoothly.
Do I need to know the student’s exact level before adding them?
No. You just need a starting point. You can choose a general level and refine it later after placement work or a few classes.
What makes the Start Next Lesson button so useful?
It removes pre-class searching and guesswork. Instead of hunting for the correct lesson link, you click one button and the assigned lesson opens directly.
Does the next lesson always update automatically?
No. Automatic next-lesson updates work best in sequential curricula. If you teach conversation classes, alternate between different course types, or choose lessons manually, you will need to assign the next lesson yourself.
How long should my after-class note be?
It can be very short. Even one sentence is enough if it captures progress or the next focus. The goal is consistency, not length.
Why should I write the next class focus right away?
Because the class is still fresh. Writing one skill or goal immediately helps create continuity and saves you from trying to remember your plan later.
Can reusable parent feedback templates help?
Yes. Reusable messages help you communicate quickly and professionally while still personalizing the note. They are especially helpful when you teach many classes in a row.
A calm teaching system does not start with a perfect setup. It starts with one repeatable routine. Put one student into your all-in-one teacher dashboard, set the next lesson, save one note, and let the system carry some of the mental load for you.
That is where smooth teaching begins.

About the Author
Meaghan
Meaghan is a Licensed Canadian Teacher, Instructional Designer, and Software Developer specializing in performance support tools for online ESL educators. As the founder of Florentis Learning, she develops CEFR-aligned curriculum and interactive applications that help independent teachers build a professional, structured practice. She also teaches ESL online, primarily supporting students in China with high-quality, engaging lessons.
Leave a Reply